Modify Calendar Permissions (Outlook)
- In Outlook (either Windows or Mac version) open your calendar
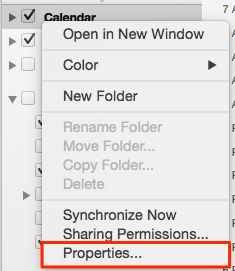
- Right-click your calendar and click Properties… or Folder Properties…
- Click the Permissions tab
• For Windows:
- Click Add…
- Search for the people you'd like to give access to and double-click to add each person
- Once you’ve added everyone, click OK
- With all the names highlighted (automatically) you can set the Permission Level as you see fit (in most cases Reviewer is a good choice) for everyone, or set it individually for each person
- Click OK
• For Mac:
- Click Add User…
- Search for the people in your department and double-click to add each person (2011) or click to select the person, then click Add (2013)
- Individually set the Permission Level as you see fit (in most cases Reviewer is a good choice)
-
Click OK
After you set up the permissions, let the person/people you set up permissions for know your calendar is available for them to view. They can use these instructions to open your calendar.
You can make calendar events private if you don’t want others to see the subject, location, and details. Right-click the event and choose Private or open the event (double-click) and click the Private button (top right).